

Single Sign-On (SSO)
Organization admins and owners can set up SAML single sign-on themselves from the HelloData app. It works with any SAML 2.0 identity provider, like Okta, Microsoft Entra ID, Google Workspace or OneLogin.
Once SSO is on, anyone whose email matches one of your domains signs in through your identity provider instead of with a password.
Before you start
You need:
- An admin or owner role in your HelloData organization
- Access to your company’s DNS provider (Cloudflare, GoDaddy, Route 53, etc.) to add a TXT record
- Access to your identity provider to create a SAML app for HelloData
- An account in your identity provider that uses the same email as your HelloData account. You’ll use it to verify the connection at the end
Setup takes about 15 minutes, plus however long your DNS takes to update.
Open the SSO settings
In app.hellodata.ai, go to Settings → Organization. On the General tab, scroll down to Add SAML Single Sign-On.
The screenshots below use an example organization called Acme Properties. Always copy the values shown in your own app, since the TXT value, callback URL and issuer are unique to your organization.
Set up SSO
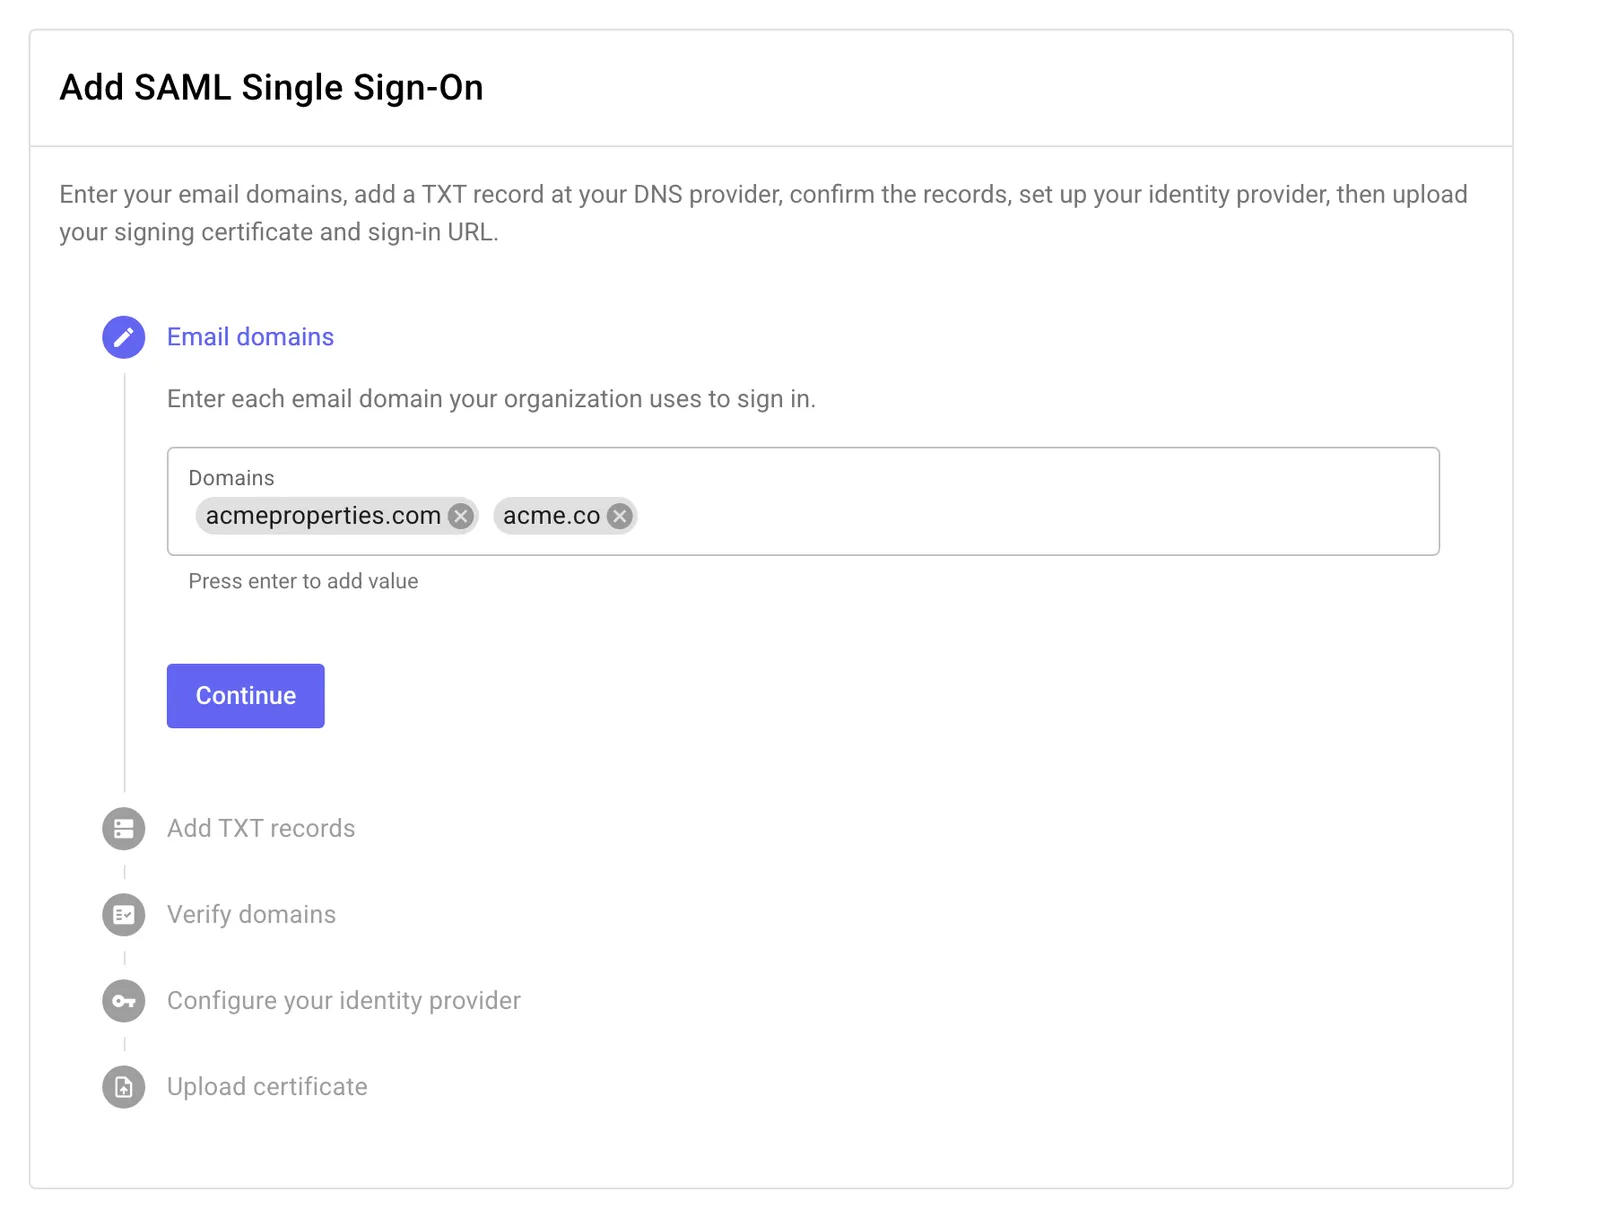
Add your email domains
Enter each email domain your team uses to sign in, like acmeproperties.com. Press Enter after each one, then click Continue.
Add a TXT record for each domain
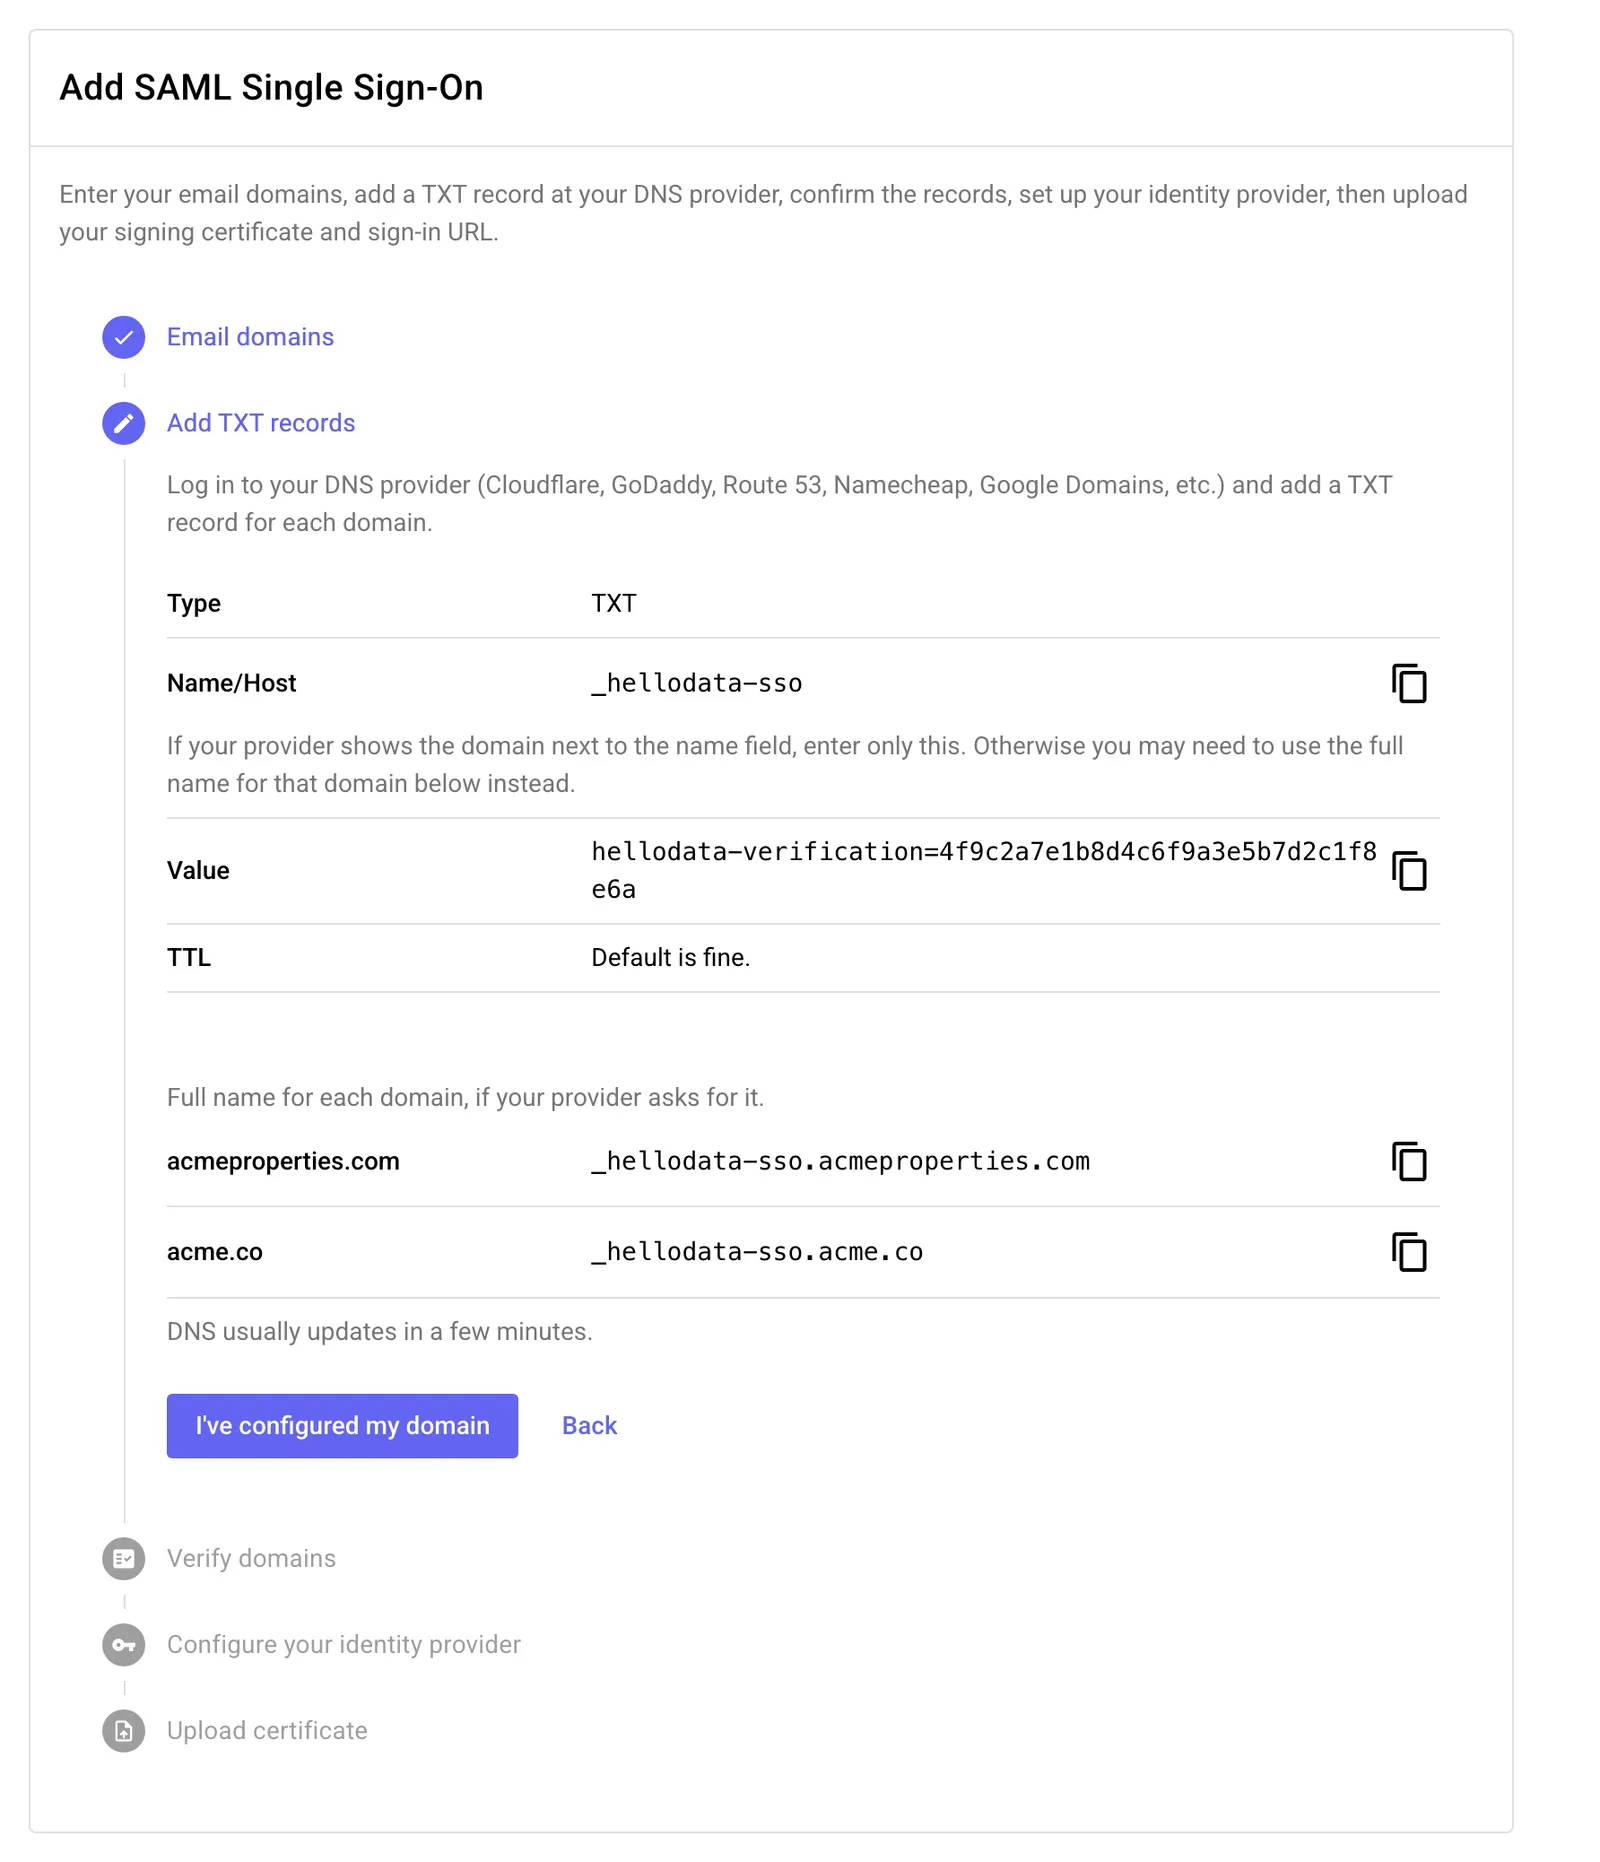
This proves your organization owns the domains. In your DNS provider, add a TXT record for each domain using the values shown:
Some DNS providers add the domain to the name for you, so _hellodata-sso is enough. Others need the full name, like _hellodata-sso.acmeproperties.com. The app lists the full name for each domain in case you need it.
When the records are in, click I’ve configured my domain.
Verify your domains
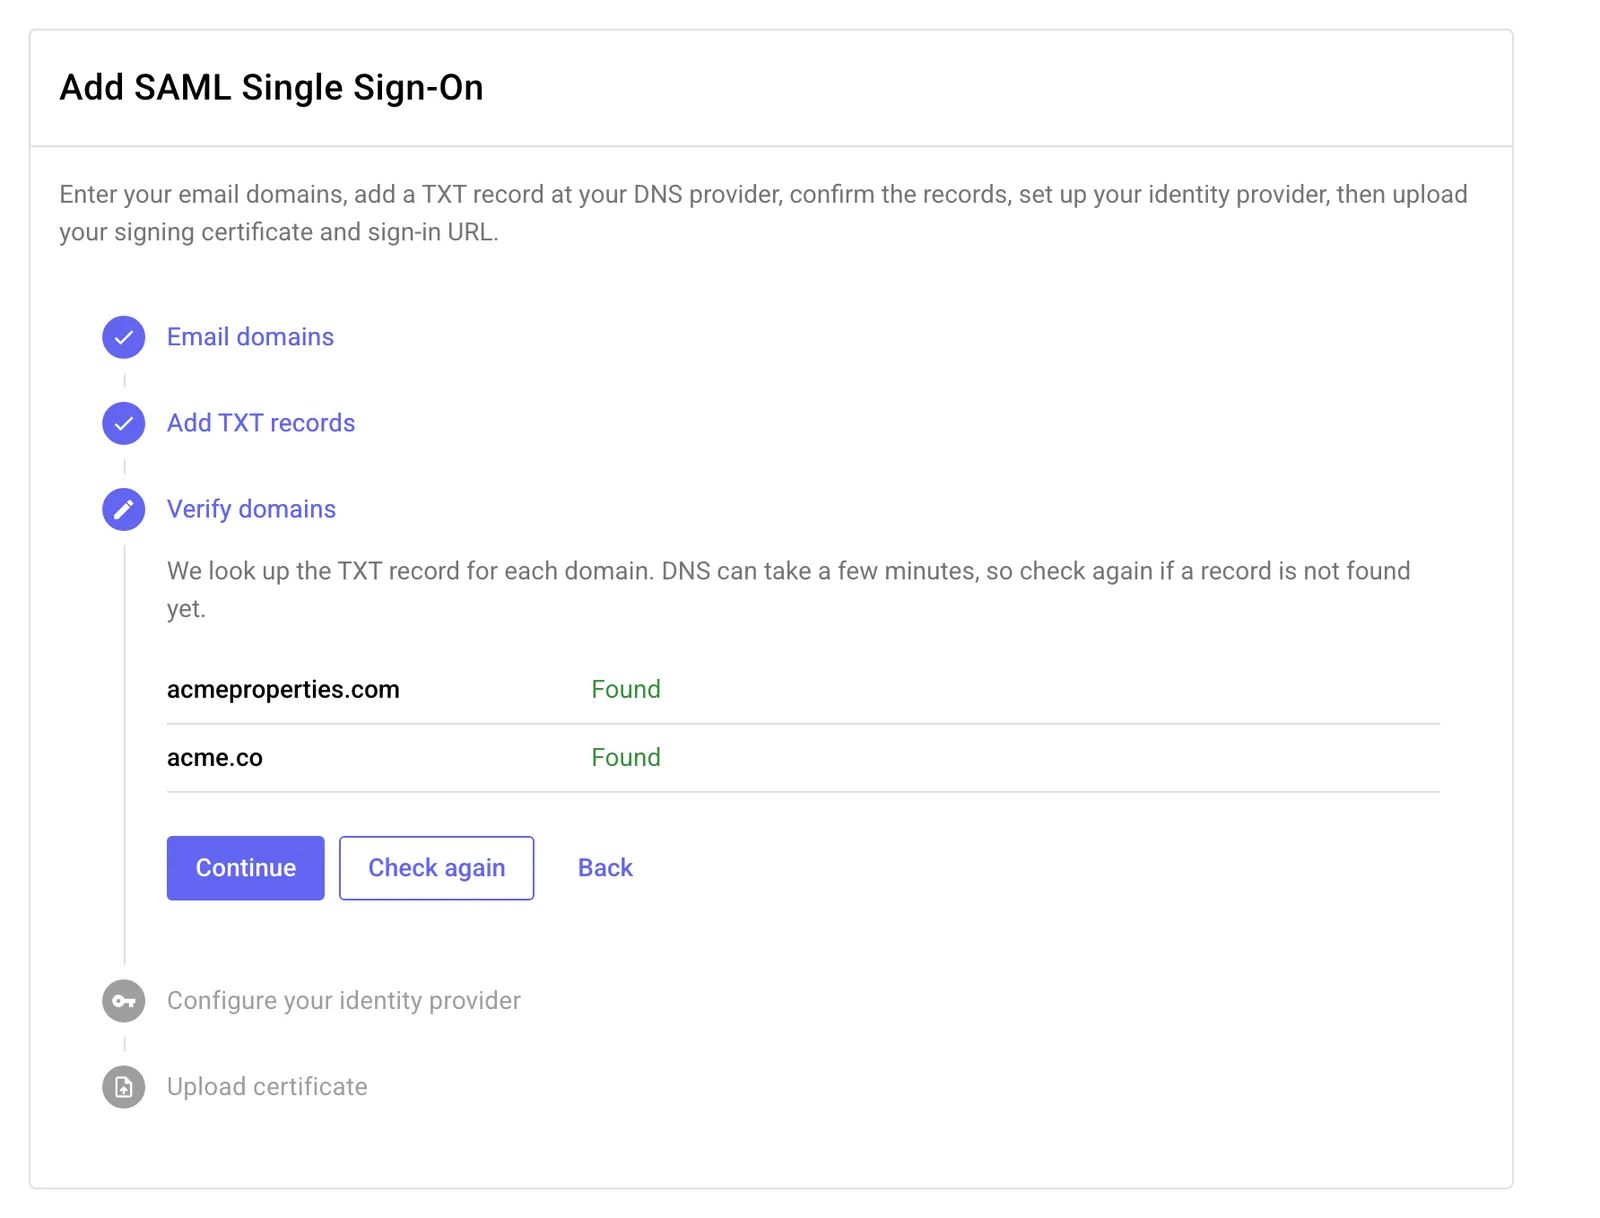
HelloData looks up the TXT record for each domain. Every domain needs to show Found before you can continue.
If a domain shows Not found yet, give DNS a few minutes and click Check again.
Configure your identity provider
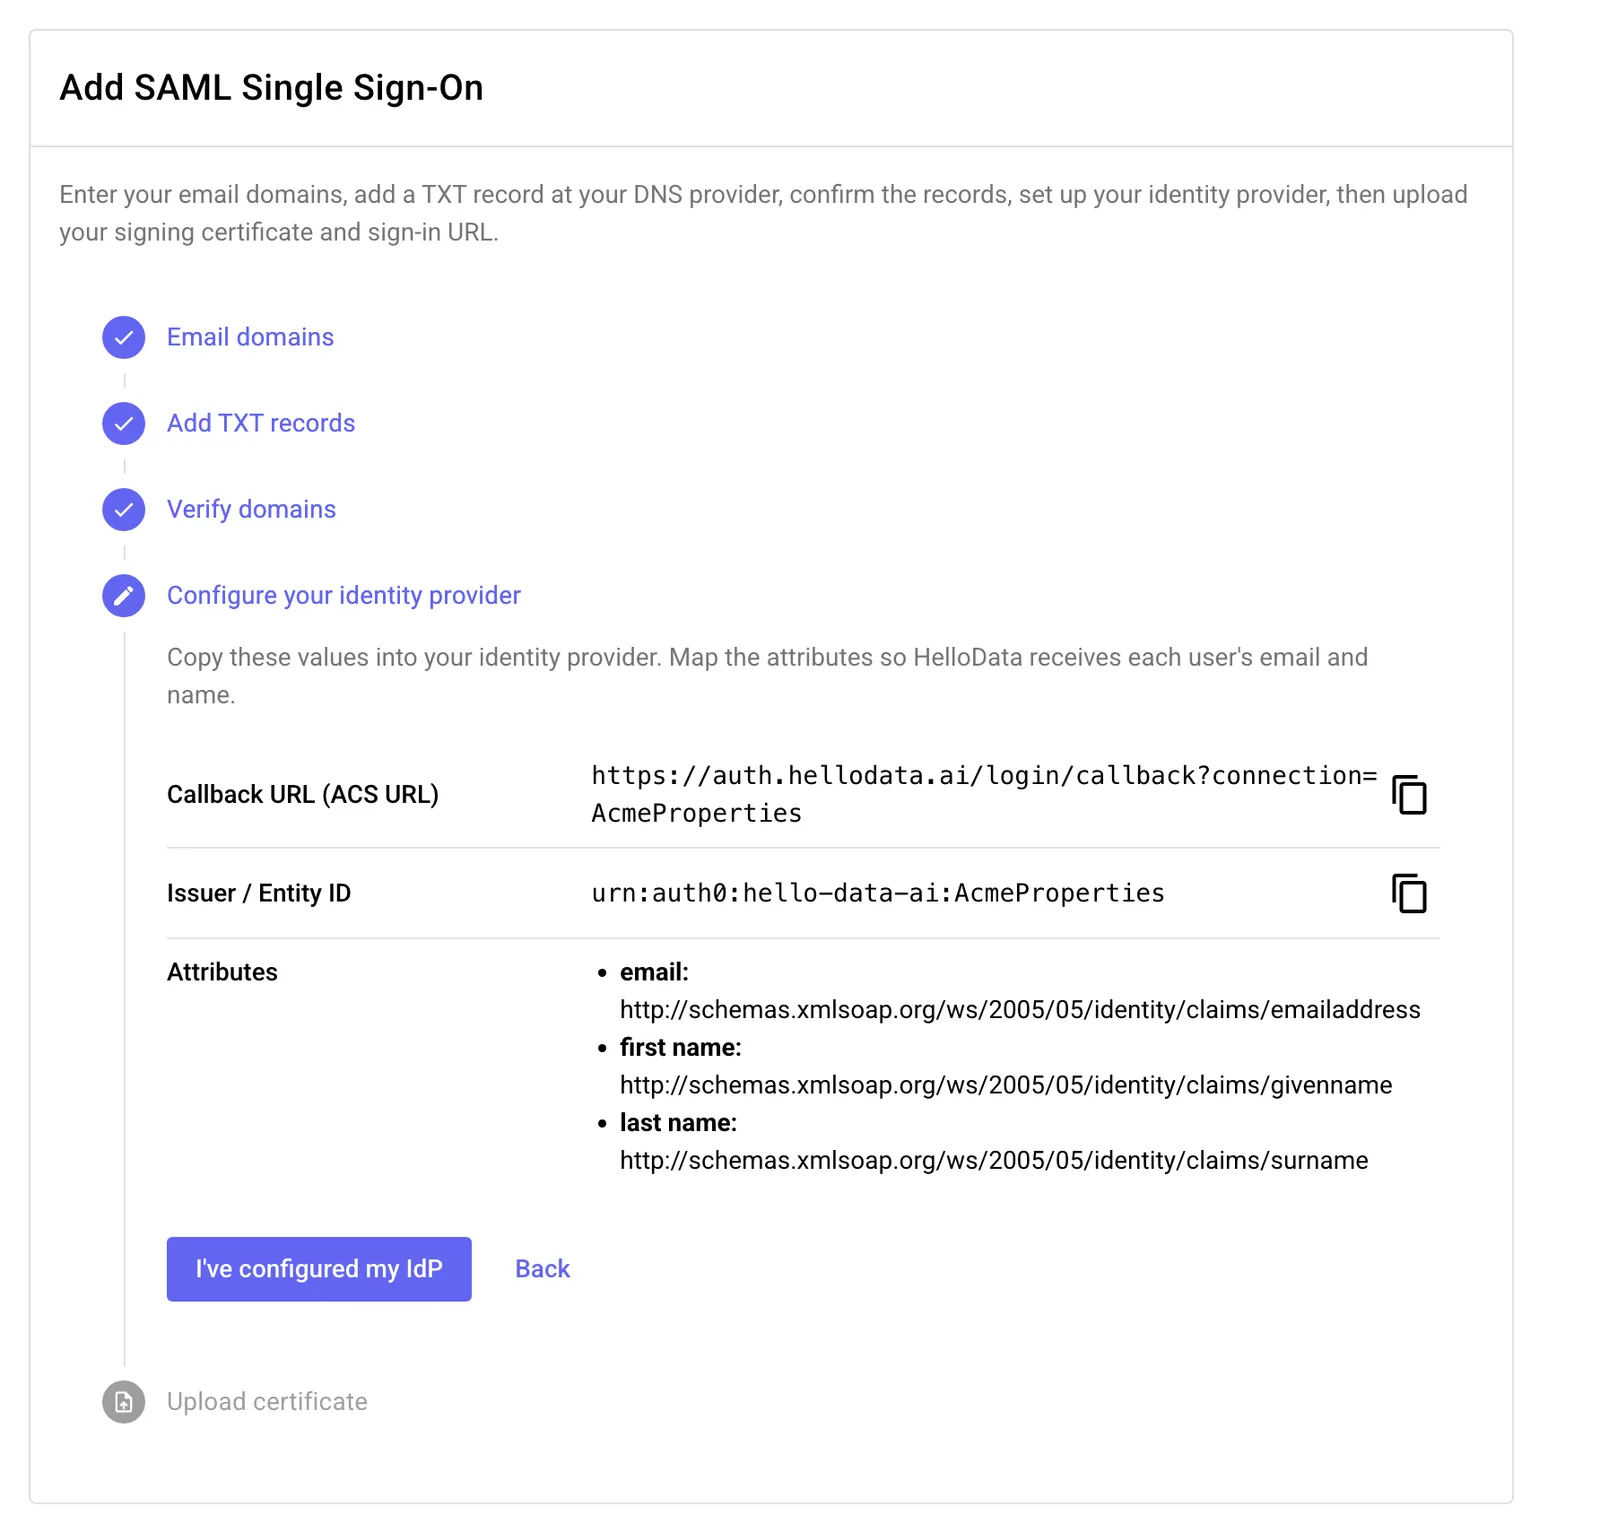
In your identity provider, create a new SAML app for HelloData and copy in these values from the app:
- Callback URL (ACS URL): also called the Single sign-on URL or Reply URL
- Issuer / Entity ID: also called the Audience URI or Identifier
Then map these attributes so HelloData gets each user’s email and name:
Assign the HelloData app to the people who should have access, including yourself. Then click I’ve configured my IdP.
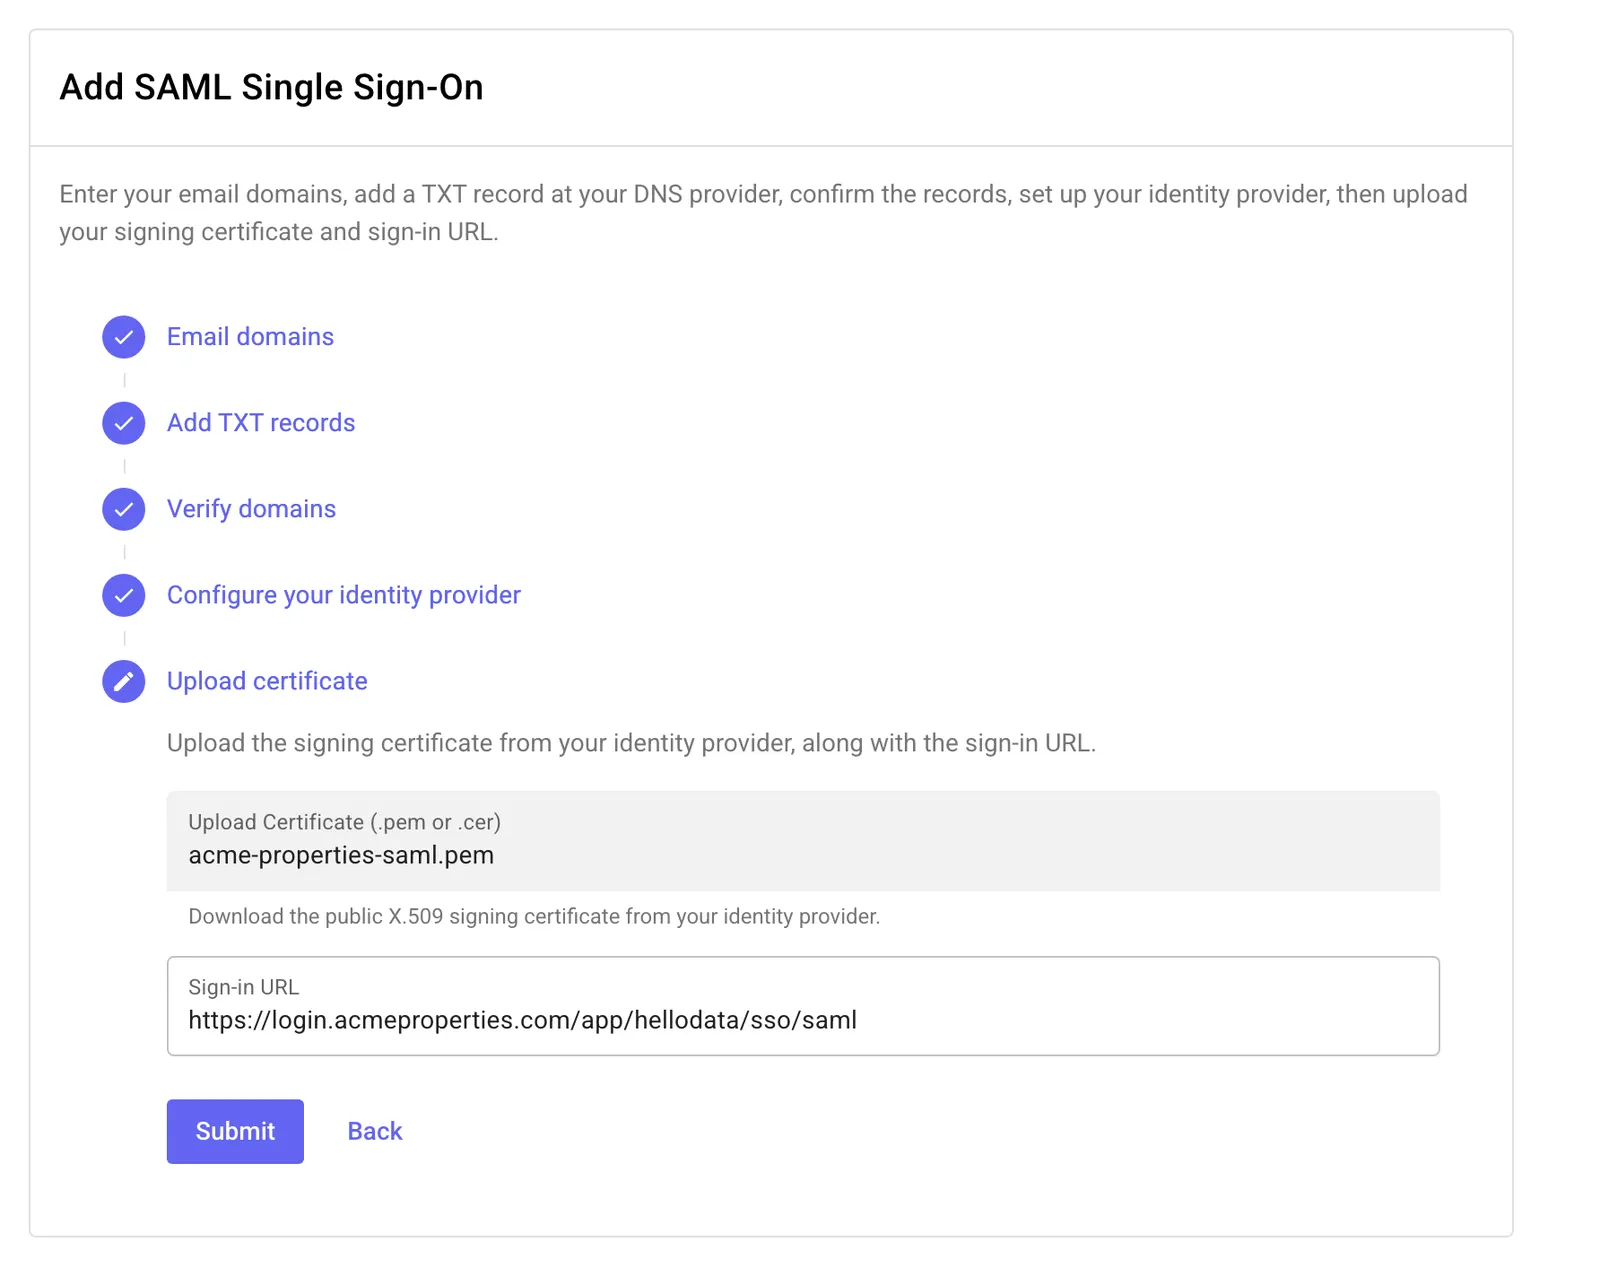
Upload your certificate and sign-in URL
From your identity provider’s SAML app, download the X.509 signing certificate (.pem or .cer) and copy the sign-in URL (also called the SSO URL or Login URL).
Upload the certificate, paste the sign-in URL and click Submit.
Verify SSO
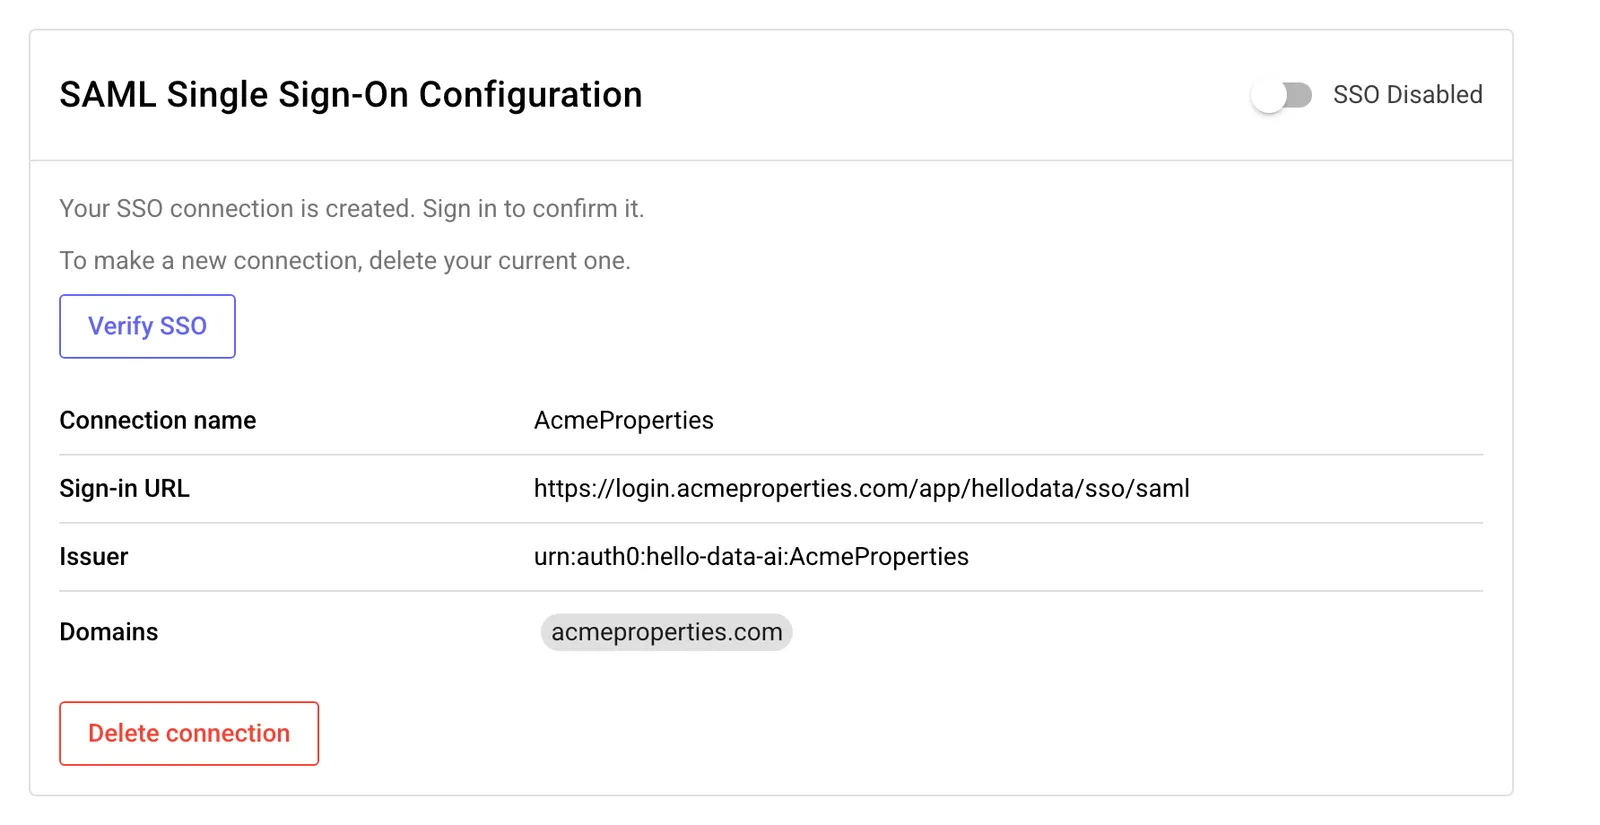
Your connection is created but not on yet. Click Verify SSO. A new tab opens where you sign in through your identity provider with the account that matches your HelloData email.
When it works, you’ll see “SSO verified. You may now close this screen.” Close the tab and go back to HelloData.
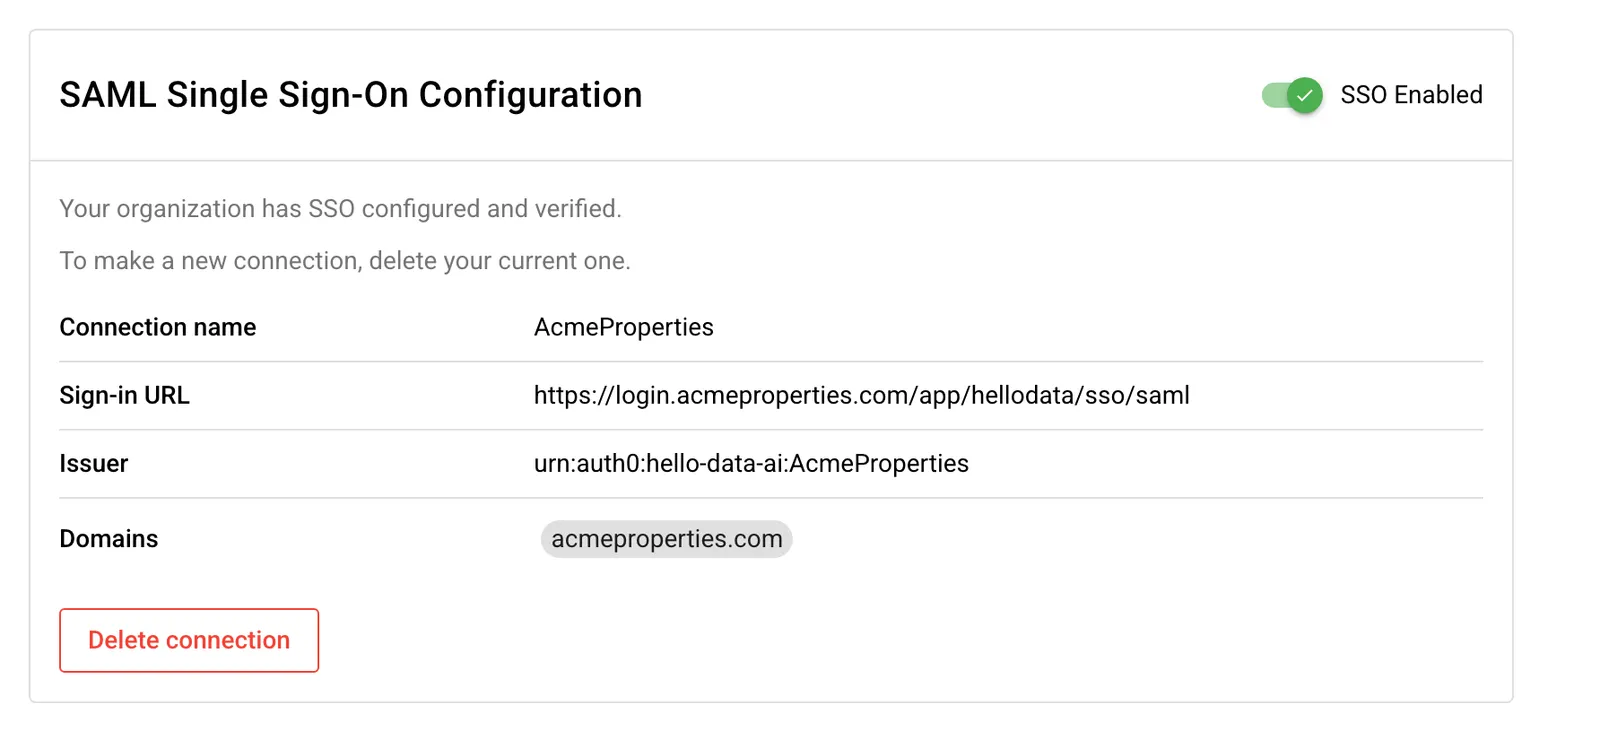
Verifying turns SSO on for your organization. The toggle in the top right now shows SSO Enabled.
How your team signs in
Once SSO is on, people with an email on one of your domains sign in through your identity provider. When they enter their work email on the HelloData login page, we send them to your identity provider.
Once someone has signed in with SSO, they can’t go back to signing in with a password while SSO is on. Make sure everyone who needs HelloData is assigned to the app in your identity provider.
Turn SSO off or on
Use the SSO Enabled toggle at the top of the SSO card. Turning it off lets your team sign in with passwords again. Your connection is kept, so you can turn it back on at any time.
You can only turn SSO on after the connection is verified.
Change or remove your connection
To change your identity provider, domains or certificate, click Delete connection and set it up again. Until a new connection is verified, your team can’t sign in with SSO.
Troubleshooting
My domain shows 'Not found yet'
DNS changes can take a few minutes, and sometimes longer. Check that the record type is TXT, the value matches exactly, and the name is _hellodata-sso (or the full name, depending on your provider). Then click Check again.
Verification failed
Check that you signed in with an identity provider account that uses the same email as your HelloData account, and that the account is assigned to the HelloData app. Also check the callback URL, issuer and attribute mappings in your identity provider. Then click Verify SSO to try again.
I don't see the SSO settings
Only organization admins and owners can manage SSO. Ask your organization owner to give you the admin role, or contact us.
Need help? Reach out at support@hellodata.ai.